File
macOS Finder 风的 Miller Columns 文件浏览器,root 模式下能看整机。长按任何行冒扇形菜单。右边一抽屉放收藏 + 最近。想同时操作两个目录?划出一块 MoveDock。想把路径丢过去?直接拽。
一句话
多列横向滚动的文件浏览器 + 全手势操作 + 特权 syscall 后端。
源码:src/screens/FileScreen.tsx(87 KB,整个项目最复杂的一屏)。它本身包含了4 个相对独立的子系统。
实拍
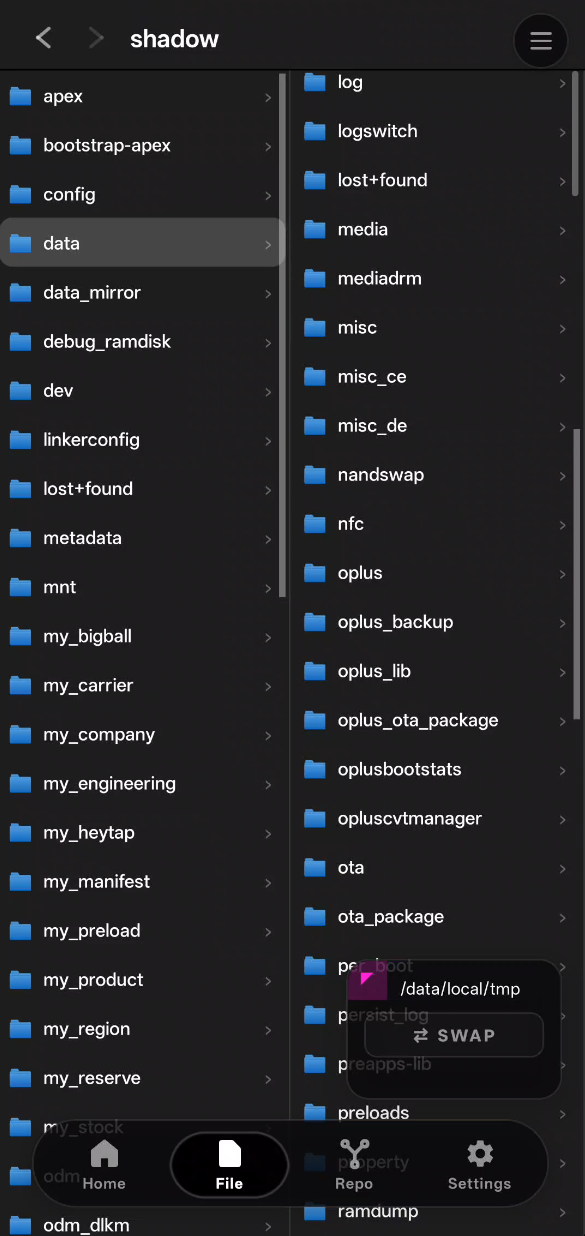
Miller Columns(横向滑、多列并排)
单列模式(窄屏 / 折叠状态)+ MoveDock 悬浮
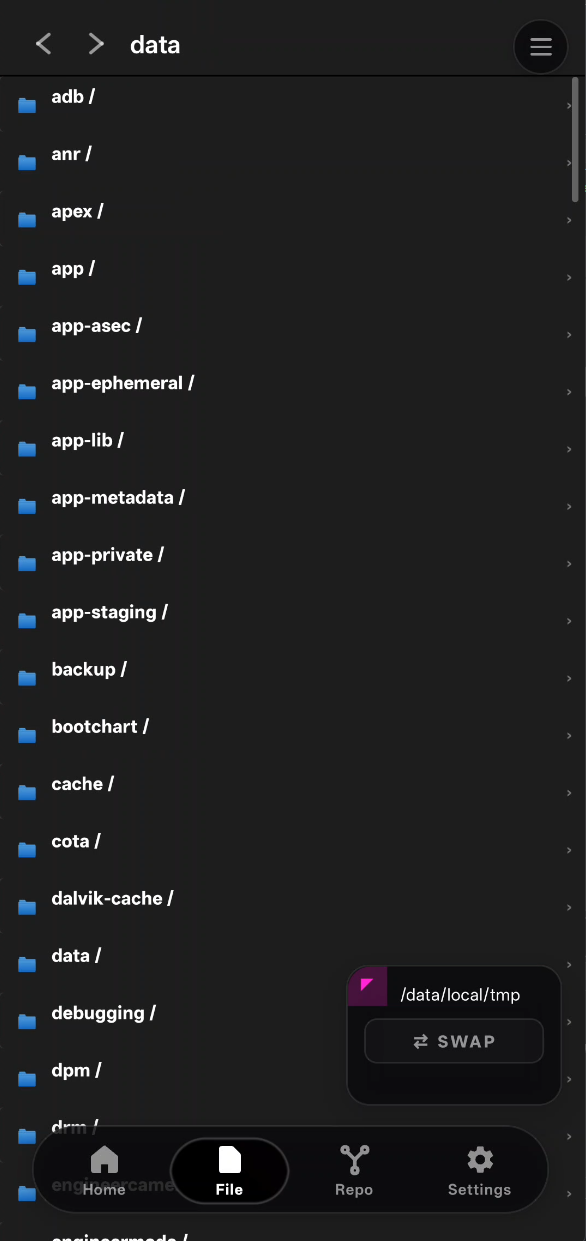
右下角那个带 ⇄ SWAP 按钮的紫色小浮窗就是 MoveDock 最小档——要操作第二个目录时双击它展开,双击 SWAP 交换主副。
长这样
┌────────────────────────────────────────────────────────────┐
│ [ ≡ ]                       [ root | user ]           [ ⚙ ]│  ← top bar
├────────────────────────────────────────────────────────────┤
│ ╱data ╱adb ╱modules                                 [jump▸]│  ← 当前路径
├─────────────┬─────────────┬──────────────────┬─────────────┤
│  /data      │  /data/adb  │  /data/adb/mods  │             │
│  ───────    │  ───────    │  ────────        │             │
│  adb        │  modules    │  shadow_ce       │             │
│  app        │  sepolicy   │  shadow_paging   │  ← 下一列预览
│  apps       │  service.d  │  killsu          │
│  local      │             │                  │
│  ...        │             │                  │
│             │             │                  │
├─────────────┴─────────────┴──────────────────┴─────────────┤
│                                  ┌───────────────────────┐ │
│                                  │  MoveDock (可选)       │ │
│                                  │  /data/local/tmp       │ │  ← 副面板
│                                  │  ─────                 │ │    拖文件用
│                                  │  a.sh   b.apk          │ │
│                                  │                        │ │
│                                  └───────────────────────┘ │
└────────────────────────────────────────────────────────────┘手势铁三角:
- 纵向 flick 在单列里滚
- 横向 Pan 整体左右滑列
- 长按单行 弹扇形菜单
三种手势同时监听,用 gesture-handler 的 Race / Exclusive 组合决定谁赢。
4 个子系统一览
| 子系统 | 干啥 | 关键代码 |
|---|---|---|
| Miller Columns | 多列横向滚动 + 单列纵向滚动 | 自造的 Pan + Animated translateX |
| Fan Menu | 长按行冒扇形选项 | useFanGesture |
| JUMP Drawer | 右边划出收藏 / 最近 | Pan detected at edge → drawer animates |
| MoveDock | 浮动副面板 | 三档尺寸可切、支持拖入 |
详细每个讲一遍。
1. Miller Columns
视觉
一列 = 一个目录。选了某列的某行 → 右边浮出下一列显示那个子目录的内容。超过屏幕宽的列被推到右边,左边列保留。
 [列0]    [列1]    [列2]    [列3]    [列4]
 /data → /data/adb → /data/adb/modules → shadow_paging → kern.h
                                                         kern.ko
                                                         README
为什么不用 ScrollView
React Native 自带的 <ScrollView horizontal> 会和单列内的纵向 ScrollView 抢手势——用户 flick 一下往下,RN 经常判断成横向 pan,整屏飞出去。
Shadow Nav 自己写了一套:
const scrollX = useSharedValue(0);

const pan = Gesture.Pan()
  .activeOffsetX([-10, 10])              // 横向超过 10px 才开始
  .failOffsetY([-15, 15])                // 纵向超过 15px 就放弃(让给单列 list)
  .onUpdate(e => { scrollX.value += e.translationX; })
  .onEnd(e => {
    // 惯性:afterVelocity 按物理减速
    scrollX.value = withDecay({ velocity: e.velocityX, deceleration: 0.998 });
  });
关键是 failOffsetY ——纵向 wiggle 超过 15px 就直接放弃 pan。让给里层的 FlatList。
自动滚动到新列
点一行 → 加一列到右边 → 自动 scrollX lerp 到新列可见:
useEffect(() => {
  const targetX = totalWidth - screenWidth;   // 最右列刚好贴屏右
  scrollX.value = withTiming(targetX, { duration: 300 });
}, [columns.length]);
2. Fan Menu —— 长按行冒扇形
每一行 <FileRow> 自己负责:
const { onLongPress, ...fanProps } = useFanGesture({
  onCommit: (slice) => handleSliceAction(slice, row),
});

<Pressable onLongPress={onLongPress} {...fanProps}>
  {row.name}
</Pressable>
长按 400ms → 扇形冒出来:
         ╱ Open
        ╱
   ╱ Copy Path
  ╱
[行] ─── Move
  ╲
   ╲ Copy
        ╲
         ╲ Chmod
          ╲
           ╲ Chown
            ╲
             Delete
7 个选项扇形排列。
扇形视觉细节
- 旋转的光圈:两圈——内圈顺时针 3s 转完、外圈逆时针 4s 转完。SweepGradient + BlurMask 做出”扫光”效果
- 线长=半径:基础圆(低 alpha)标记扇形”死区”——手指在这圈内都当作未选择
- 每条光束尾端一个点:发光 + 径向 glow
- hover 态:手指停在某光束上 → 该光束整体亮度 ×1.5,尾端点 scale ×1.3
onLongPress 行自识别
关键设计:行自己触发 onLongPress,Pan gesture 只处理 move / commit——零坐标命中测试。
// useFanGesture.ts 骨架
const onLongPress = () => {
  // 行主动告诉 hook "我被长按了,在这个坐标"
  setAnchor({ x: pageX, y: pageY, row });
};

const pan = Gesture.Pan()
  .onUpdate(e => {
    if (!anchor) return;
    // 算 relative 向量 → 落在哪条光束上
    const angle = Math.atan2(e.y - anchor.y, e.x - anchor.x);
    const slice = angleToSlice(angle);
    setHoverSlice(slice);
  })
  .onEnd(() => {
    if (hoverSlice) onCommit(hoverSlice);
    setAnchor(null);
  });
如果不用行自识别,Pan 就得对每一行做包围盒命中测试——行数上千会炸。
3. JUMP Drawer —— 右边抽屉
右边缘向左 swipe → 一张抽屉从右滑出:
┌────────────────────────────┐
│   [主视图]       ┌────────┐│
│                  │ JUMP   ││
│   Miller         │        ││
│   Columns        │ 收藏   ││
│                  │ /data  ││
│                  │ /sdcard││
│                  │        ││
│                  │ 最近   ││
│                  │ /tmp   ││
│                  │ ...    ││
│                  └────────┘│
└────────────────────────────┘- 宽度 240px
- 底:半透明磨砂
rgba(15,15,20,0.92)+ 背景模糊 - 点抽屉外的任何地方 → 抽屉收回(backdrop dismiss)
路径 drag 从 JUMP 拖出来
JUMP 里的路径可以长按拖出——松手丢到主视图 / MoveDock 上。
const drag = Gesture.Pan()
  .onStart(() => {
    // measureInWindow → 记录起始点
    setDragging({ path: row.path, startX, startY });
  })
  .onUpdate(e => {
    // 拖动时显示一张半透明 ghost 跟着手指
    ghostX.value = e.absoluteX;
    ghostY.value = e.absoluteY;
  })
  .onEnd(e => {
    // 命中哪个 drop zone?
    const zone = findZone(e.absoluteX, e.absoluteY);
    if (zone === 'main') navigateTo(row.path);
    else if (zone === 'dock') openDockAt(row.path);
  });
4. MoveDock —— 浮动副面板
想同时操作两个目录?点主视图右上角 [→] 按钮,底部升起一个副面板:
┌────────────────────────────────┐
│                                │
│       [主 Miller Columns]      │
│                                │
├────────────────────────────────┤
│ /data/local/tmp           [⇅]  │  ← MoveDock 顶栏:双击交换主副
│                                │
│  a.sh         b.apk            │  ← 副面板列表
│  c.zip        d.md             │
└────────────────────────────────┘
3 档高度
点 MoveDock 顶栏右边小把手:
| 档 | 高度 | 用途 |
|---|---|---|
| min | 40px(只显一行) | 只占当前路径,快速参考 |
| mid | 屏幕 35%(默认) | 常用 |
| max | 屏幕 70% | 大量拖拽时 |
双击顶栏 = 交换主副
const onDoubleTap = () => {
  const tmp = mainPath;
  setMainPath(dockPath);
  setDockPath(tmp);
  haptic('light');
};
“我在主视图深入了个目录,想回头看刚才的” → 双击交换。
从 Dock 拖到主视图(反向 drag)
和 JUMP 一样——Dock 里任何一行可以长按拖出,丢到主列某列。
路径 drag 坐标系的那个坑
拖拽过程中最折磨人的 bug:
期望:ghost 贴着手指动
现实:ghost 永远偏下 64px原因:gesture-handler 给的 event.absoluteX/Y 是窗口坐标系(相对 window 左上角),但我们的 <Animated.View> 父容器顶部有 64px 的 top bar——它的 local 坐标系 y=0 对应窗口 y=64。
所以 ghost 画在 absoluteY=100 时实际上在窗口 y=164 的位置。
解法:offset 补偿
const [containerOffset, setContainerOffset] = useState({ x: 0, y: 0 });

useEffect(() => {
  containerRef.current?.measureInWindow((x, y) => {
    setContainerOffset({ x, y });
  });
}, []);

// 画 ghost 时减掉 offset:
const ghostStyle = useAnimatedStyle(() => ({
  left: ghostX.value - containerOffset.x,
  top:  ghostY.value - containerOffset.y,
}));
measureInWindow 告诉我们容器自己在窗口中的绝对位置,减掉就能把 absolute 坐标转成 local。
后端:FsModule Kotlin 桥
所有文件操作都走 src/native/fs.ts → FsModule (Kotlin) → 内部决定是走 Os.*(非 root)还是走 su 会话池(root)。
3 个常驻 su 会话
┌─ FsModule singleton ─────────────┐
│                                   │
│  sessions = [ su_0, su_1, su_2 ] │  ← 启动时 spawn 3 个 su 进程
│                                   │     每个进程保持打开
│  executor = 4-thread pool         │
│                                   │
└───────────────────────────────────┘
JS 侧发 readDir / stat / chmod:
readDir("/data")
  → JS thread 发 promise
  → bridge 扔到 Kotlin executor
  → executor worker 抢到一个 idle session
  → 写 stdin: "ls -la /data\n"
  → 阻塞 readLine,watchdog 5s timeout
  → parse 输出 → resolve promise
  → session 回 idle
为什么不每次 Runtime.exec("su -c ...")
每次 exec 都要fork + exec + 解析 —— 50+ms 开销。persistent session <5ms。
nsenter -t 1 -m
root 模式下每个会话开启时做一次:
exec nsenter -t 1 -m -- sh切到 PID 1 的 mount namespace——一进去就能看到整台机器的完整 mount 视图(包括 zygote 看不到的 system mount、vendor 分区等)。
对文件管理器极其重要——不这样的话 /data/vendor_de/ 这种路径根本看不见。
性能:目录 LRU 缓存
JS 侧 src/native/fs.ts 带 LRU 32 个目录:
const cache = new LRU<string, FileEntry[]>(32);

export async function readDir(path: string): Promise<FileEntry[]> {
  const cached = cache.get(path);
  if (cached) return cached;
  const entries = await NativeModules.FsModule.readDir(path);
  cache.set(path, entries);
  return entries;
}
用户反复切回同一目录 → 秒出。
Invalidate 规则:mkdir / delete / move / rename 都会 invalidate 相关目录的 cache。
手势仲裁(那个最乱的部分)
同一 FileRow 同时监听四种手势:
| 手势 | 用途 | 触发条件 |
|---|---|---|
| Tap | 打开行(进下一列) | <200ms 松手 |
| LongPress | 弹 fan menu | >400ms 按住 |
| Pan (horizontal) | 让给父层 Miller 滑列 | translationX 先超 10px |
| Pan (vertical) | 让给单列 FlatList 滚 | translationY 先超 15px |
仲裁用 Gesture.Race 组合:
const composed = Gesture.Race(
  Gesture.Exclusive(tap, longPress),    // tap 和 longPress 互斥
  Gesture.Simultaneous(panX, panY)       // 两个 pan 谁先通过 activation 谁赢
);实战教训:failOffset 配得比 activeOffset 小一点——让 pan 不会”激活后又失败”。
相关文件
src/screens/FileScreen.tsx— 主屏(87 KB,Miller Columns + Fan + Jump + Dock + Drag)src/hooks/useFanGesture.ts— 长按扇形共享 hooksrc/native/fs.ts— JS 侧 FsModule 包装 + LRU 缓存src/native/fileIcons.ts— 文件类型图标映射android/.../FsModule.kt— Kotlin 实现(su 池 / nsenter / Os.* fallback)